Internet connection speed—how do you really know if you’re getting what you pay for?
Estimated reading time: 14 minutes
We spend a lot of money to have access to the global Internet. Most of us are paying for multiple “on ramps” too, as it were. We have our home connections, most often through a cable, fiber, or DSL Internet Service Provider (ISP), but occasionally through a satellite or cellular ISP, especially if our residence is in a rural area. Then we have our smartphones, tablets and hotspot devices, all of which may have a dedicated Internet connection through a cellular provider. In every case we want our connections to be speedy, but that’s especially true for our home connections, where gaming, video streaming, audio streaming, and file sharing are taking place, often by multiple people sharing a single on ramp through home WiFi.
Cellular providers typically sell Internet access not by speed, but by the amount of data consumption allowed. This makes a lot of sense, because cellular providers have a lot less control over how much speed is available to a device since that device is frequently roaming. Cable, fiber and DSL providers, on the other hand, are sending their data over wires to a fixed location. This makes it possible for service providers to promise a certain speed to a customer since they have control of the network and the conditions for the receiving device rarely change.
Testing speed on a cellular connection is largely done to satisfy curiosity—the carrier is typically not promising a certain speed, after all. On a connection with a fixed location, however, testing speed is important so you have an assurance you are getting the speed you are paying for. If your provider sells you a plan that advertises 100Mbps download bandwidth and you are only getting 50Mbps, something’s wrong and you need to be able to determine what that is so you can mitigate the issue and get what you’re paying for.
Now, before we go any further, it’s important to note there are a lot of factors that affect network speed. How you test the speed of your Internet connection is important, too, because doing it wrong can lead to false assumptions about who’s at fault if a test indicates less speed than what you are paying for. Let me provide an example:
Ron wants to test the speed of his connection to the Internet. He navigates to a popular speed test website, speedtest.net, in his browser. He is using his laptop, which is connected to the Internet via his home’s WiFi. The router in his home is several years old and while it does provide access to every room in the house, family members complain that when they stray more than 30 feet from it, videos experience frequent buffering and web pages load more slowly. Ron is in a different room from his router when he initiates the speed test. After the test completes, Ron is disappointed with the results, which show his Internet access speed is considerably less than what his cable provider advertises for the plan he purchased.
This example highlights several mistakes people often make when testing their internet connection speeds. First, never test over WiFi unless you know your router and your computer support connection speeds that are faster than what is being provided by your ISP and your proximity to your router permits you reaching those speeds. Second, it’s always best to test your Internet connection speeds via an Ethernet connection between your computer and your router. This eliminates the bandwidth bottlenecks associated with WiFi. Even better? Connect your computer directly to your modem via Ethernet, bypassing the router (some routers allow you test your connection from the router, which should provide the same accuracy as connecting a computer to the modem). This should give you the most accurate results for a speed test, because you are right at your network’s edge and assured that your computer is the only device on that connection. Third, don’t rely on a single test or a single testing provider, but confirm the results by testing with several testing providers, such as those listed later in this article.
What other factors affect the speed of a connection? Your device, for one. If you have an older computer, your network drivers are outdated, you have a ton of tabs open in a browser, or your browser is slowed by thousands of cookies and images in cache, your browsing experience is going to be negatively affected. Similarly, if you have a lot of devices sharing your connection—and especially if several of them are pulling a lot of data (streaming video, for example)—your experience could be degraded. If your router is misconfigured or you have sources of interference between your computer and your router, such as a running microwave or a water heater, your network’s wireless performance will be degraded. This doesn’t mean that issues are only on your side of the modem, however. On your ISP’s side of things, network congestion, faulty hardware, noisy lines, etc, can all result in reduced performance that are outside your control and will require your ISP’s involvement to mitigate.
What we measure
Now, let’s talk about what we’re measuring when we test the speed of an Internet connection. From your ISP’s perspective, as this is what they advertise, speed is equal to bandwidth. More specifically, the bandwidth from the Internet to your modem, which is referred to as downstream bandwidth. Typically, this is the only number ISPs advertise because it’s usually a much bigger number than the upstream bandwidth, as most Internet connections are asymmetric. If you’re lucky enough to have a fiber connection, then it’s likely your connection is symmetric, meaning the downstream bandwidth and upstream bandwidth are identical.
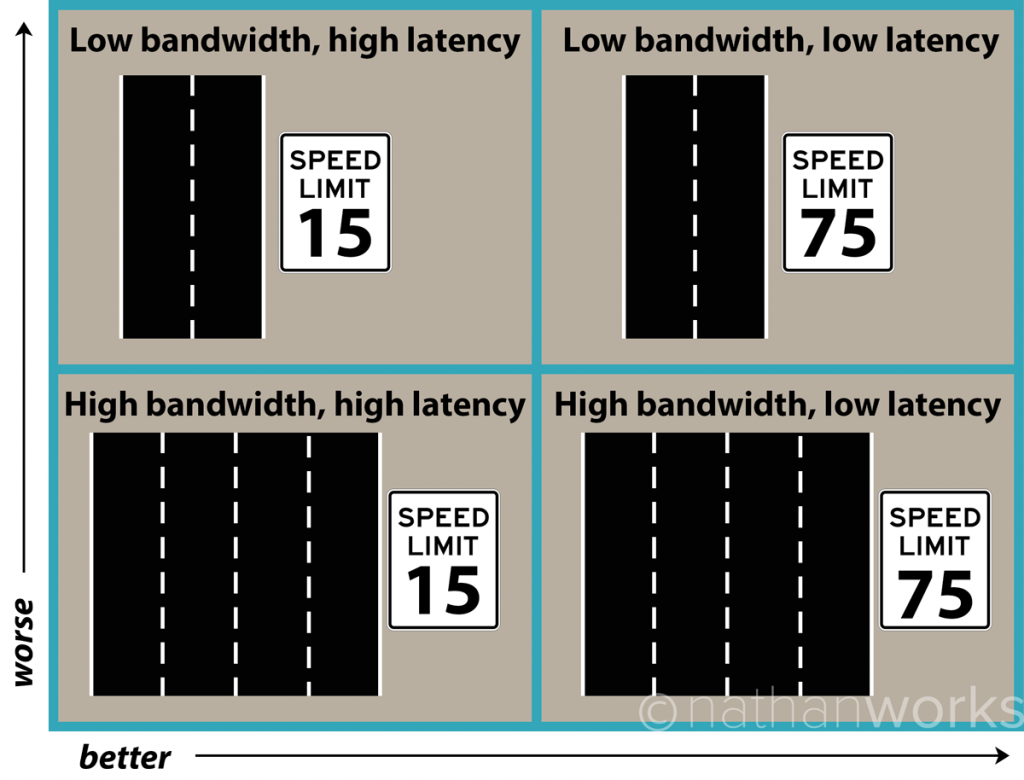
However, bandwidth is only one piece of the speed equation. The other important factor is latency. Latency is how quickly you are able to send data to a server and get a response. Latency is not really a big deal if all you are doing is sending and receiving email or doing some casual surfing, but it becomes very important for online gaming, video conferencing, and streaming. Imagine trying to talk to someone over a Teams call, for instance, and there is a slight delay between when you talk and they respond—you end up talking on top of each other, which becomes very annoying, very quickly. Simply put, having a lot of bandwidth available is good, but if your connection has high latency you may not have the wonderful experience you are expecting.
An easy way to understand how bandwidth and latency interact is to compare an Internet connection to a highway. A lot of bandwidth, typically measured in megabits per second (Mbps), is equivalent to a multi-lane highway. The more lanes you have, the more traffic that can be accommodated. Latency, measured in milliseconds, is the speed limit on that highway. Lower latency equates to a higher speed limit, so the lower the latency, the faster the traffic moves on the connection. Thus the optimal Internet connection will have high bandwidth and low latency. The relationship between bandwidth and latency is demonstrated in the following graphic.
Internet connection speed testing
There are lots of tools for measuring Internet connection speed, but I’m going to focus on just a few. Some routers, like the Netgear Nighthawk that powers my network, even offer a speed test from their admin interface, so check there first. This is optimal because it rules out WiFi as a limiting factor and removes the necessity of your having to connect a computer to the router via Ethernet (which is becoming more challenging these days as more and more computers eliminate the Ethernet port). Remember, however, that the most accurate way to measure your Internet connection speed is by connecting a computer directly to your modem to run these tests, unless your router offers a speed test.
While the test built in to my router is very convenient, it only measures download and upload bandwidth (shown below), not latency and other metrics, and it does not allow me to choose a test location, as the speedtest.net website and smartphone app do.

If I want to measure network latency, I can use utilities built right into Windows and MacOS. For MacOS, follow these instructions to access the Network Utility app and run the ping command. In Windows 10, click the search icon next to the Windows Start button and type command. Open the Command Prompt. At the prompt, type ping google.com, as shown below.
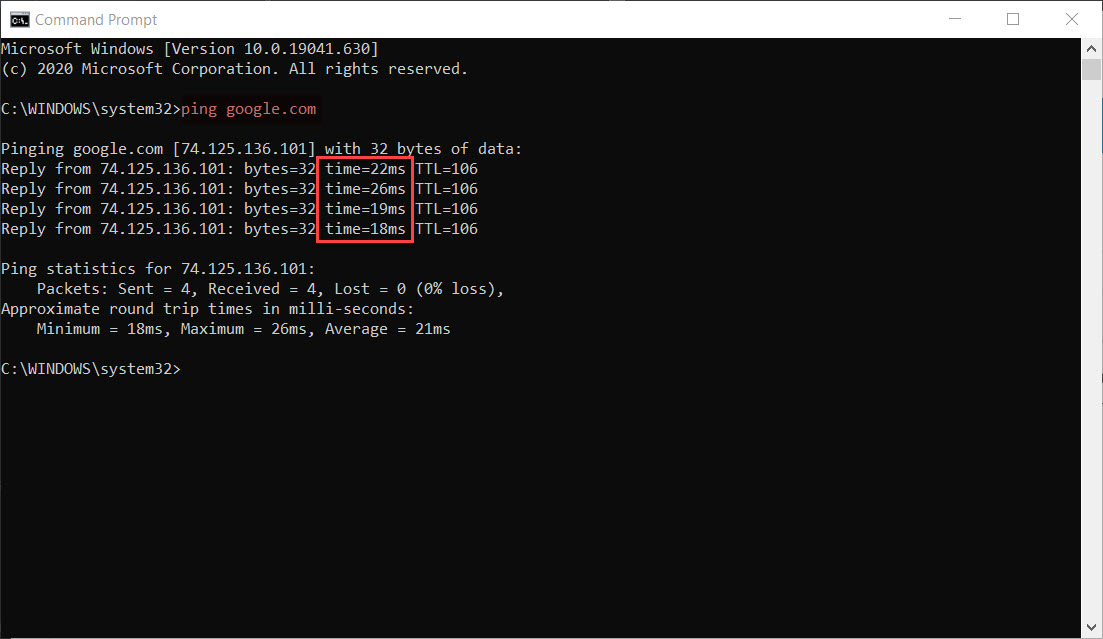
You can try pinging various domains or alternatively, enter an IP address. While certainly useful for showing latency for sites you might frequent, ping doesn’t provide any information about how far away the responding server might be.
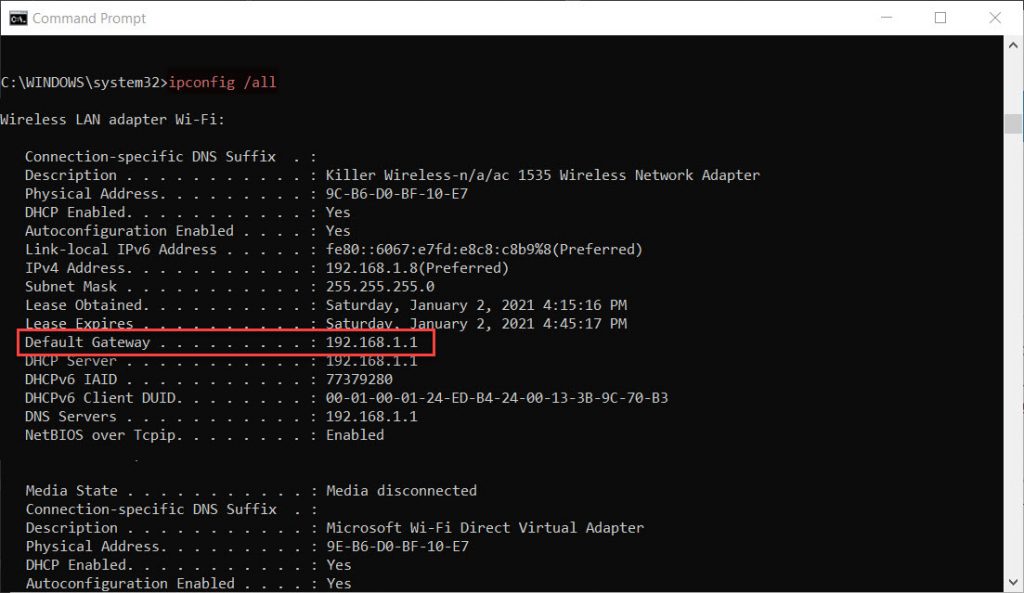
To see how physical proximity of a responding server affects latency, ping your gateway IP address and then a server on the Internet to compare the difference. If you don’t know your gateway IP address, you can discover it by typing ipconfig /all at a command prompt, and then look for the Default Gateway IP address listed under the active network connection, as shown below.
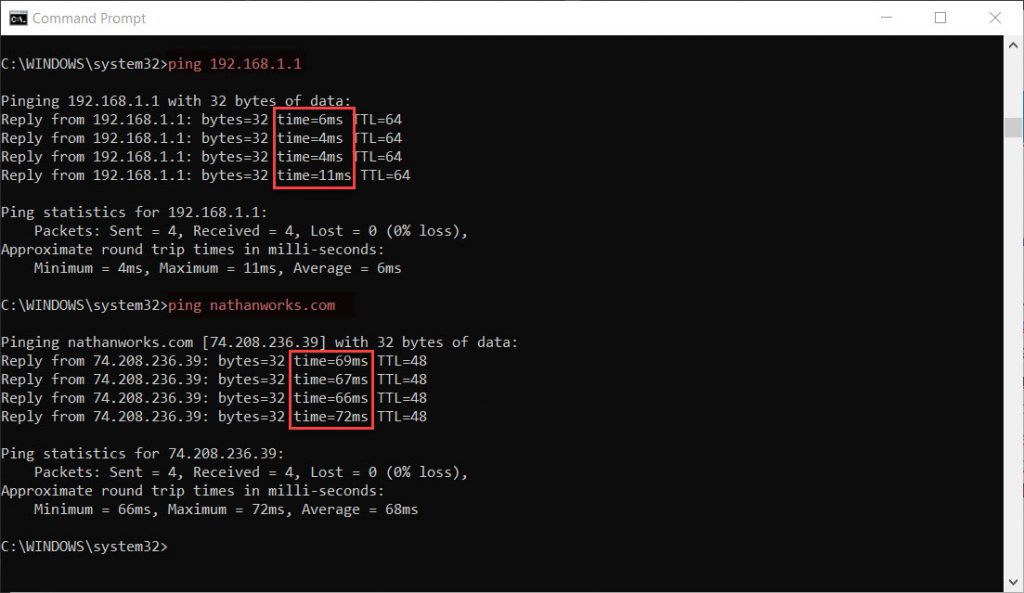
Here’s an example of a gateway ping followed by a ping of this site’s domain name.
Using speedtest.net
Note you can download apps for all major operating systems, but for this article I will show how the service works in the browser. Since the physical distance from a responding server affects latency, it can be important to have that information. After all, we should expect a responding server in our town to respond much more rapidly than one located thousands of miles away. That’s one feature I really like about speedtest.net, that it allows you to choose the location of the server that responds to the ping.
Aside from the plethora of advertisements, speedtest.net presents a fairly spartan interface. Simply click the big “Go” button to initiate the test. It measures latency (ping), download and upload speeds. Note the default responding server is one it chooses for you, based on your region. However, the neat thing about speedtest.net is you can change the location of the responding server, as shown below.
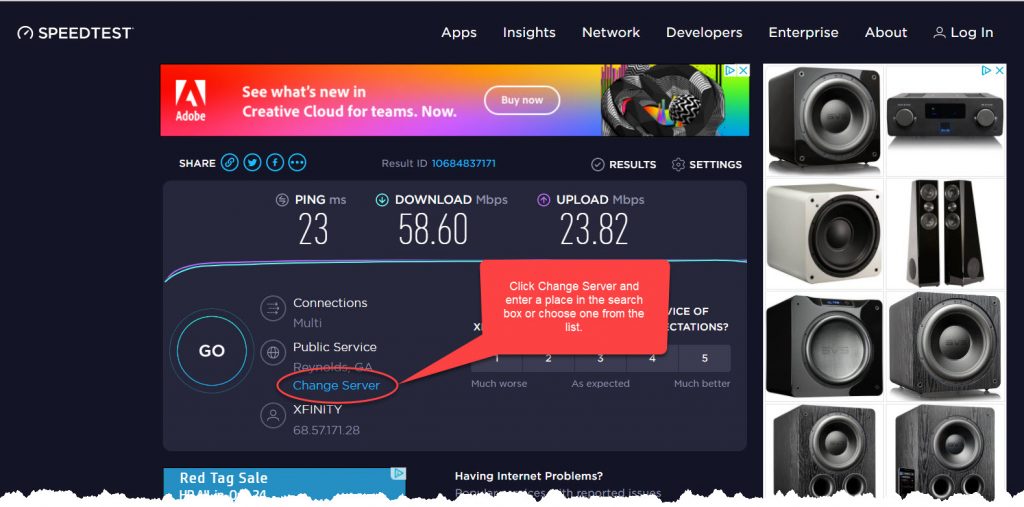
You can have a lot of fun with this setting. I like to see how my speed changes as I choose places like Japan, Russian, and Iceland. Seriously…give it a try!
Clicking on the Results link just above the values shows your results over time (from the current browser). This helps build a history of your speed tests, which is handy if you are trying to pinpoint slowdowns that occur at a certain time of day, for instance. It also shows how your test results compare to other testers. If you sign up for an account, speedtest.net will store your results regardless of the browser, network or machine you initiate the tests from.
Using Cloudfare’s speed test
Remember that for solid testing you shouldn’t rely on a single test provider. I really like Cloudfare’s speed test, which offers a good bit more information about your connection speed than speedtest.net, but lacks the option to specify the responding server location. Cloudfare’s speed test begins the second the page loads. Once it completes, you have the option to restart it. If you want to compare results from test run to test run, it offers the option to download the results in a csv file, which you can then open in Excel or other spreadsheet application. This is handy if you want to average test results over time, for instance, or simply document test results. Unlike speedtest.net, Cloudfare does not offer the option of a results history.
Cloudfare’s speed test is speedtest.net, but with all the toppings, as it has a ton of data on tap if you want it. As shown below, you can expand each of the data components to see the results of each of the test passes. If you hover your mouse over a result, Cloudfare explains the results and offers all sorts of statistics.

Cloudfare’s speed test also adds an additional measurement to the mix: jitter. Jitter is valuable because it shows the variance of latency between measurements. This gives you an idea of how stable your Internet connection is. A high jitter number may indicate problems with streaming, gaming and VOIP, as all of these activities rely on a stable Internet connection.
Additional resources
As I indicated earlier in the article, there are dozens of good speed tests available. I simply highlighted the methods I use the most.
In addition to the built-in OS utilities, speedtest.net, and Cloudfare’s speed test, here are other speed tests I use on occasion:
- Fast.com: This speed test from Netflix is as simple as they come, offering only your download speed. It’s designed to demonstrate the suitability of your connection to stream Netflix videos.
- Speakeasy Speed Test: Another relatively basic speed test, but with the option to test your connection with 10 metro areas around the US.


Leave A Comment